Monday, September 1, 2014

Feeding the Bees

We have tried a few different methods of feeding during our time with the bees.  The bucket method I've mentioned previously in this blog was messy and sometimes we would find dead bees in the puddles of sugar water that dripped onto the frames.  These days, when we feed our bees, we use the plastic baggy method. Each gallon-sized Ziploc baggy contains four cups of sugar mixed into two cups of water (usually - you can change the ratio depending on what your bees need).

My hubby tells me the difference between his method and what most people do with the baggy method is that most people just place the bag of sugar syrup on the frames, but he finds that messy and so puts the bag on the inner cover and puts an empty medium super over it. This has been very effective and not messy. We have not had bees drown with this method, either. All other syrup feeding methods we have tried resulted in some dead bees.

Here is my son feeding his hive late last winter:

Image

and my hubby feeding his:

Image

Simply fill the bag with your syrup, lay it in, and cut a slit.  I highly recommend this method of feeding.

Friday, August 29, 2014

A Durable Clothesline


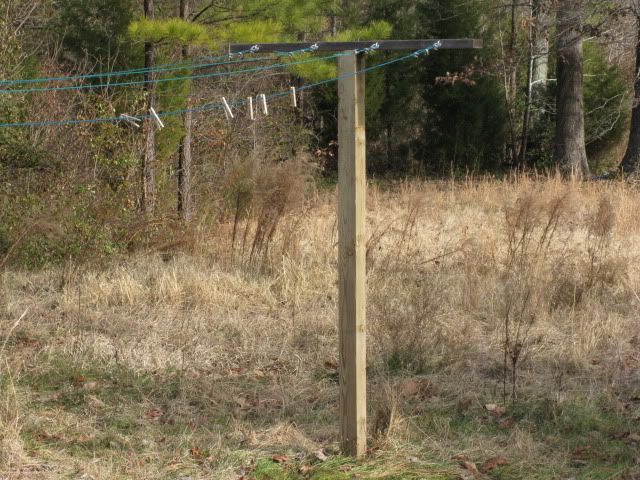
I built this clothesline March 2010.  Children have used it as a jungle gym when they thought I wasn't looking and I have used it extensively throughout every year since it went up.  There are several loads of towels hanging on my clothesline as I write this. 

Posts

For each post, I used:
1 treated 4x4x8 
1 treated 2x4 cut to a length of 4'
4 eye bolts
Nails
Quikrete

I used a screw and several nails to attach the 2x4 T to the top of the 4x4 post, but I'm afraid I can't tell you what nails and screws they were as I found them in a bucket in the barn when we moved in.  They appear to be galvanized nails, but I don't know what size they are.  You shouldn't have any problem finding something sufficient at your local home improvement store.  

The eye bolts are attached to the narrow face of the 2x4 T.  I placed the first eye bolt  in six inches from the end and added three more, each 1ft apart.   This allows for good air flow between rows of clothes and accounts for the wind blowing things around.  Put your eye bolts in before you put your post up. 

Consider how far apart you want your posts.  The line I recommend below usually comes in 20 ft or 100 ft lengths.  Check below to see how to install the line before deciding, because you have to include the tail of the line in your measurements.  You can center your holes 20' - 22' apart and have plenty for all four strands from a 100' roll of line. 

Use a post hole digger to make a hole for each post 1.5' - 2' deep.  I bought this hand auger for putting up my line and have used it extensively since.  I find it a lot easier to use than a clam-shell digger and even my kids can dig perfect holes with it. 

Slide the post into the hole and fill the hole about half full with Quikrete.  Wet the Quikrete and let it set overnight (Quikrete does not require mixing like other concrete mixes and is great for posts).  The next day, backfill the rest of the hole and string your line (more on stringing the line below). 


Wire Clothesline

My first line was polyester line that claimed it wouldn't sag, but it sagged big time.  After some research on the various types of line available, I chose coated wire.  Rope lines sag over time if not right from the start.  Depending on the material, they can harbor mold and mildew, as well.  Coated wire is easy to clean and does not sag as much. 

This year, my line seemed to be sagging.  I thought this odd since I hadn't experienced significant sag in the line previously, but I thought perhaps the green plastic coated wire had finally reached the extent of its life.  It turns out, however, that my husband hit one of the posts with his tractor and didn't tell me about it.  The post snapped under ground level and took a while to shift in the dirt, so it was not immediately obvious and I purchased the new wire before I discovered the real problem.

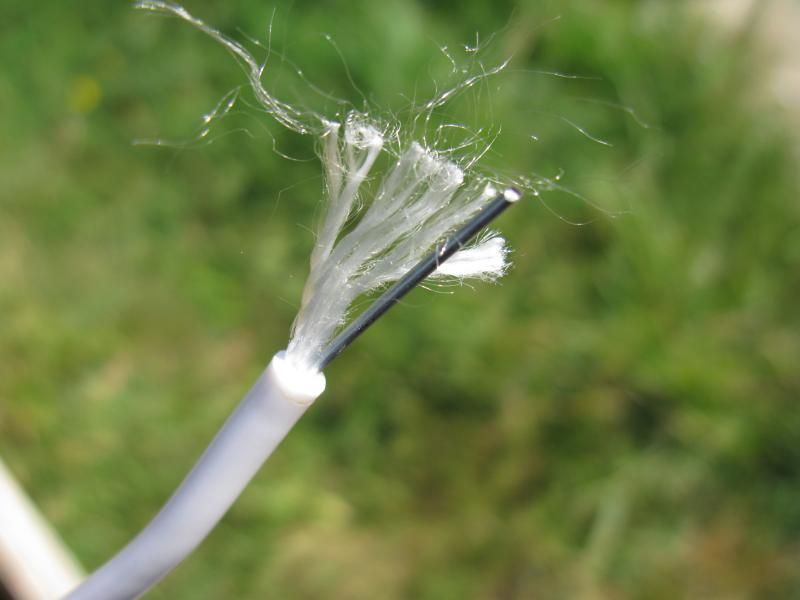
I saw white plastic coated wire on Amazon and thought maybe it was the same thing as the green coated wire I was already using, just a different color.  I figured I would give it a shot, but I learned that it is not the same thing:


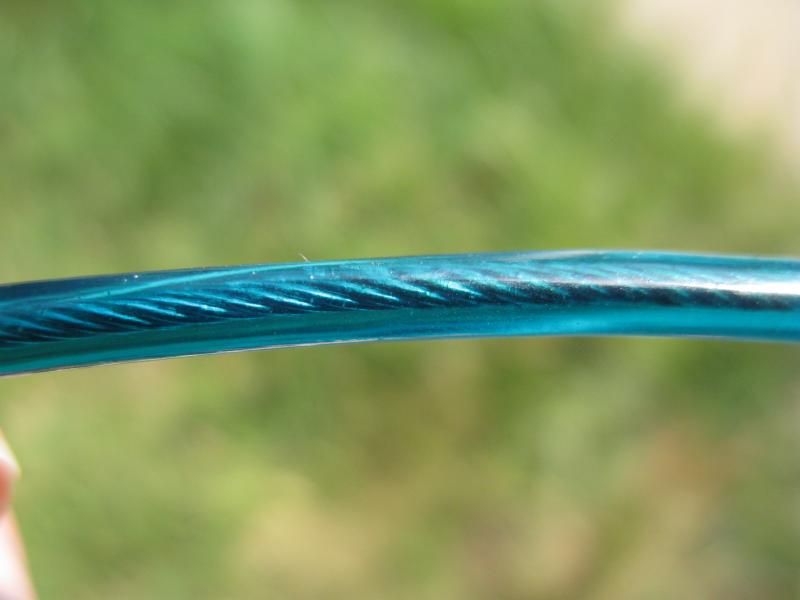
The white line is a single wire and thin rope inside while the green line is twisted wires inside.  The white line had a tendency to kink and was difficult to work with.  It was hard to get it taut.

I recommend skipping the white coated wire line and going with the green coated wire line.


I have learned that a lot of people try to knot these wires rather than use hardware to properly assemble the line.  The white wire would be nearly impossible to knot and it just seems silly with any wire product.  You really want to use wire clips and thimbles.  That link is to one on Amazon, but I believe the ones I bought were cheaper at WalMart.  You can usually find them at places like Lowes and HomeDepot, too.  You can find them where you would fine clothesline.   


Each clip consists of a U bolt, saddle, and a pair of nuts.  A pack for a wire clothesline consists of a thimble that slides onto an eye bolt on your post and two or three clips.  The standard is typically three, but two may be sufficient.  You can generally find instructions for using these on the package, but let me give you a brief rundown. 

One major thing to remember when using these clips is "never saddle a dead horse".  That may seem a bit macabre, but it's easy to remember.  The U bolt goes on the tail (or dead) end of the wire while the saddle goes on the line itself.

As shown in the illustration, a standard assembly includes three clips: one at the thimble and the other two about two inches apart.

To attach the clip, simply place the U bolt against the tail and slide the saddle over the legs.

Then add the nuts and tighten.  You can use a wrench to accomplish this, but I find that it is much easier with a ratchet, especially considering you need three clips for each end of each line (that's 24 clips total for my setup).  That's a heck of a lot more work with a wrench.

Here are a couple of pics showing how the line looks assembled with the thimble and clips:


Please don't laugh at my awful nail job.
 
Ok, you can laugh.  It is really awful.  I'm better at it now.  I used more substantial nails to attach the T to the post.  The T rocked in a bit of a pivot and it didn't occur to me at the time to add a nail or two in the top to put an end to that.  Instead, I attempted to nail this bit of board to the front of the post with some rather weak little nails I found on our property.  They really did not want to go in!  Anyway, that bit of wood and mess of nails was part of my learning experience.  It did solve the problem, even if it wasn't the best possible solution. 

This is a pretty simple project.  It is a little labor intensive, but if you do it right the first time, it will last you many, many years (unless somebody comes along with a tractor to break your post!). 


Sunday, August 17, 2014

Mead: The Drink of Odin or Maybe Someday Vinegar


What the heck is that? 

Hubby found this article called "How to make Mead today - the cheap, fast, and easy way" over at Storm the Castle.  If you've never been over there, it's pretty cool - lots of DIY, castles, swords, etc.  We don't drink at all, so maybe it's a little weird that we're making honey wine, but that's exactly what that jug is - or what it will be.

Now, when that jug was first filled and topped with that balloon, the balloon hung limply to one side.  Later, I noted with pleasure how good it was making the house smell.  Hubby put his hand on my leg and announced, "it's erect!".  He was looking at that jug on the counter, noting that the balloon had finally risen! Funny man.

Not really sure what we'll do with it when it's done.  Hubby thinks we'll give it as gifts.  I'm wondering how a pair of T-totallers can determine how good the wine turns out.  I mean, we just do not have a palette for alcohol.  We'll see, I suppose.  Perhaps we'll just make vinegar of it.  According to The Vinegar Experiment over at Florida Hillbilly, making vinegar of it should be pretty simple.

It will be some time before we make it that far.  Alcohol takes time and the longer the better.  We'll just have to wait and see.

Monday, June 16, 2014

We Have Pigs!

We all know bacon is awesome and the price of pork is pretty up there. I had been told that pigs are typically not a cost-effective homestead food source because most breeds cost a lot to feed. Enter: the pasture pig. I didn't know there was such a thing until a couple of years ago, but there are breeds that feed primarily on pasture grasses and hay just like most cows. In our research for pasture pig breeds, we discovered the kune kune pig - a relatively small, gentle natured pig that fattens well on pasture. Some say they don't root, but I beg to differ. They may not root as much as some other breeds, but they do root some.

This breed was introduced to New Zealand in the 19th century and likely interbred with other feral introduced species. They were rediscovered in the 1980s with an estimated 50 purebred kune kunes remaining. Efforts to revitalize the population continue to this day and you may find that many breeders raise purebreeds for this purpose or as show pigs, making them rather expensive. However, if you are patient, you can often find a good deal from pet breeders.  We found our pigs with a breeder who had an accidental litter and she was letting them go for $100/pig. Show and purebreds typically go for more than ten times that, so be patient and keep your eyes out for Craigslist ads if you are interested in this breed or do the work to find a small farm that raises them for farming purposes.

These guys are clean animals. Our goats poop everywhere, but pigs pick a spot away from their food and bed for pooping. You can even train them to use a particular spot and some people litter box train them and keep them inside (you need a pretty big litter box and a fairly large house, these guys don't stay tiny). In my opinion, these pigs make great backyard pets or easy-to-raise pork. These two are expected to reach between 75 and 150 pounds based on previous litters from the same parents. Kune kunes generally stand about two feet tall at the shoulder. Because they are docile, don't tend to roam, and enjoy the company of people, these pigs are touted as a great breed for first-time pig owners.

Here are our young piggies at about 2 months old back in May:

Image

Pigness Everdeen
Image

Gale Hogthorne
Image

This breed is known for rolling over when their bellies are scratched. They also wag their tails and like to play with toys.  This YouTube video demonstrates some of this behavior:

https://www.youtube.com/watch?v=WZGKF38Di7s

(Sorry, Blogspot is being difficult and I can't embed the video.  Please follow the link to see it.)


Since getting these two, I learned two things about them: 1) they may pick a single place to poop, but Pigness pees in the pool and 2) they like to eat goat poop. Image

Here you can see that they do root in the dirt spots:
Image

They still love a tummy rub:
Image

They love splashing around in the pool:
Image

The two piggies chase each other for fun and they are so freaking adorable running around and having fun in the yard. They seem to be having a real blast.


Friday, June 13, 2014

The Sweet Taste of Honey

This spring saw many additions to our homestead, not the least of which was a motorized honey extractor.

Here you see it bolted down to a pallet with a plywood top - each leg is on a support board in the pallet:
Image

The dish under each leg would later be filled with cooking oil (I used peanut oil because that is what we had on hand) to keep ants out of the machine and out of the honey. 

Last month, my father-in-law came to visit and he was interested in the bees. He donned my suit and went out with my hubby and a couple of my kids. One of the honey supers was mostly full, so hubby decided to go ahead and show his dad the process.

We had three generations of our family out in the beeyard collecting a super:

Image


Here is hubby uncapping the honey (this is wet-capped honey):

Image


Frames of honey loaded into the extractor:

Image


Honey and wax flowing out of the honey extractor:

Image


The honey pours into a filter that sits in a bucket:

Image


Three generations watching frames spin in the honey extractor:

Image


Somebody has to hold the lid, right?

Image


My shiny honey extractor selfie:

Image


I cannot imagine having to do that with a crank extractor. We only did six frames and it takes a good bit of spinning to get all that honey out. I'm very glad we have a powered extractor.  Although, smaller crank extractors are a lot less expensive. 

Also, I got to use the power washer to clean the extractor out afterwards (sorry, no pics since I'm the photographer and the power washer user). I love our power washer and I highly recommend every homeowner and beekeeper have one. Ours is just a dinky one that cost under $100 at Lowes and it still gets a lot done. There were things that I thought were discolored that turned out to be just dirty. It cleans up honey and even soft wax with minimal effort.

Monday, June 9, 2014

ESCAPE FROM WORMCATRAZ

The worms tried to escape, so this happened:
Image


As I lay my head on my pillow, I realized that I had forgotten to shine a light at my Worm Manor. See, red wigglers like to explore in the dark, or perhaps they just felt the need to escape after being kidnapped, thrown into a sack, and then summarily dropped into a box. Regardless of their motive, it's a good idea to shine a light on a newly populated vermicomposter for a couple of days. Here's what happens if you don't:

Image

Image

Image


I found two intrepid explorers already drying out on the floor, but I rescued them before I could snap pictures. The lid had been on, by the way, so don't think your worms will stay in the box just because you put a lid on it. You must use light to train these guys to stay in the bedding.

I sprayed down the covering newspaper really well to keep the contents of the bin from drying out while open under the light.

Image

It was merely damp by the time I got up.

I'll do this again tonight and then simply check them for the next few nights. It shouldn't take them long to realize what luxury they are living in and stay buried. :crazy:


Friday, June 6, 2014

Vermicomposting - How to "Mine the Spice"


Using the Vermicomposter

Using the Stacking System

The basic idea is to fill the bottom tray, then add a tray. If you are using shallow trays like on most commercial vermicomposters, fill it to about 1” below the top before adding another tray. If you are using large bins in a homemade vermicomposter, fill them a little over halfway before adding a new bin.

Here is how the system works with four worm trays/bins:

Step 1: Starting out
Tray 1 – Place a layer of damp newspaper on the bottom of the tray/bin. Add moist bedding, some garden soil (if possible), worms, and food. Keep covered with a light over the bin for two days. On the third day, check the worms. If they are moving about the food you put in the bin, you can now add food and bedding until full. Keep covered. You no longer need the light shining on the bin. If the worms are not moving about in the food, give them another two days and check them again.

Step 2: Processing
Remove cover and add Tray 2 on top of Tray 1. Tray 1 is now a processing tray. DO NOT add food to Tray 1 anymore. Tray 2 is now the feed tray. Add bedding and food (about equal amounts of both) along with a bit of garden soil to Tray 2 until filled, keeping it covered.

Step 3: Processing
Remove cover and add Tray 3 on top of Tray 2. Tray 1 and Tray 2 are now a processing trays. DO NOT add food to Tray 1 or Tray 2 anymore. Tray 3 is now the feed tray. Add bedding and food (about equal amounts of both) along with a bit of garden soil to Tray 3 until filled, keeping it covered.

Step 4: Processing
Remove cover and add Tray 4 on top of Tray 3. Tray 1, Tray 2, and Tray 3 are now a processing trays. DO NOT add food to Tray 1, Tray 2, or Tray 3 anymore. Tray 4 is now the feed tray. Add bedding and food (about equal amounts of both) along with a bit of garden soil to Tray 4 until filled, keeping it covered.

At this point, you have a stack of trays that are in process and worms will be moving about through all of the trays, though the bulk of the population will be moving upwards.

Step 5: Harvesting
Remove cover. Move Tray 1 to the top of the stack. Tray 2 will now be the bottom of the stack of trays. Use your garden cultivator and/or scraper to gently loosen the material in Tray 1 and remove it from the sides towards the center in a mound. Leave the cover off in a well-lit area or shine a lot on the top of Tray 1. This will encourage any worms that are in the tray to move down into the feed tray. In about 30 minutes, begin removing the compost from Tray 1 until you encounter worms. Repeat loosening material and waiting with light on the tray until the worms have all moved out of the tray and you have harvested all of the compost from the tray. The tray is now available to be added as the next feeding tray once Tray 4 is full.

Keep the trays rotating so that the top one is the only one you add food to and the bottom one is the one you harvest from. Harvest from the bottom one as the top one is filling up so that you will have another tray to add when the top one gets full.

If you are using a large homemade bin system, I would recommend using no more than four bins or the stack could become unwieldy. The smaller commercial systems are designed to be able to stack many trays high.

Troubleshooting

Finding other critters in your bins – Other critters are not uncommon in the worm bin. Here is a guide to what you are likely to find and what, if anything, you should do about it.

Worms are forming a ball – Worms ball up when they are stressed. Some things that cause stress include temperature extremes (too hot or too cold), the environment is too wet or too dry, or food they find icky. The bedding should feel about like a wrung sponge; it should not be drippy wet, but should feel damp. As for food, worms do not like meat or dairy and they are not fond of spicy or salty foods in general. Also, feeding them garden or farm materials that have been chemically treated may upset them.

Worms are escaping! – Stress can cause worms to escape their bin. Check “worms are forming a ball” above to identify what may be the cause of their stress. To keep them in the bin, you can take the lid off and shine a light on the bin. They don’t like light and will burrow down to get away from it, keeping them in the bin. Make sure the bedding doesn’t dry out too much with the lid off and try to identify what it is that is upsetting the worms to fix the issue.

ANTS! – Unless you already have an ant problem, your bin should not attract ants. However, if you have an ant problem (like we do) you can put a tray under your bin or a dish under each leg. You can try putting water in the tray or dishes, but some ants can traverse water. If yours can, use a bit of oil instead. We use peanut oil because it comes in huge jugs for frying and we use a lot of it in our honey processing shed to keep ants out of the various honey processing areas. You can use olive oil, vegetable oil, etc.


Using/Storing Your Compost and Leachate

Compost
You can put your fresh compost directly into your garden or plant pots. If you have no garden or potted plants (you probably do if you are on ZS), give it to your friends and neighbors or maybe sell it at a farmer's market (check your local regulations). I typically find this stuff going for about $1.75/lb as I write this.

To store it, do not put it in an airtight container. According to Nature's Footprint (the maker of the Worm Factory), "placing actively decomposing organic materials in an airtight container encourages anaerobic organisms to take over, and form plant toxic by-products which can cause a foul smell". Let the material dry a little so that it is damp but not wet. Store in a container that is not airtight and cover with a moist layer of newspaper. This allows the organic material to stabilize in an aerobic environment and gives it a shelf-life of about three years.

Leachate
Leachate is basically waste produced by the system. Since a system contains both "good" and "bad" bacteria, you should not use Leachate on edible plants. You can use it on flowers, but you should dilute it ten parts water to one part leachate and aerate (with a pump, by stirring vigorously, or by pouring repeatedly from one container to another). If it smells, discard it where it will not harm plants.

Worm Tea
Leachate is sometimes confused with "worm tea" which is beneficial to plants. Worm tea is formed by brewing vermicompost in clean, chemical free aerated water to encourage the growth of beneficial microbes that are great for gardens, including edible ones. Adding molasses to the water stimulates "good" microbial growth. This worm tea can be used like a medicine sprayed on sick plants, overwhelming the "bad" microbes with "good" ones to help the plant get better. It boosts the plant's immune system to help it resist parasites like aphids and nematodes. While vermicompost is great for growth, it is best for food at the roots as it breaks down over time while the worm tea is great for spraying on plants to give them a boost with good microbes.


Check the Vermiculture or Worms links to the right under "Posts by Topic" to learn more about vermicomposting including how to build your own inexpensive vermicomposter.